Usage Patterns
Fast Dash helps build and deploy Proof of Concept (POC) applications lightning fast while having you, the innovator, write as less UI development code as possible.
This document outlines some common Fast Dash patterns and how you can use these ideas to fastrack your deployment.
Before you begin
Never worry about web app development or deployment before you are comfortable about your main Python functionality and supporting code.
Note
The whole Fast Dash promise is to decrease the time needed for app development after you have written the main Python software, not distracting you from your innovation.
So focus on the main functionality of your code and don't worry about the web app.
After you are comfortable with your Python function ...
1. Setting input components
By setting the correct callback function type hints, their default values, or choosing Dash components, and built-in Fast components, you can display most common UI elements for users to enter their inputs.
Note
If you used the proper Python function type hinting practices, you might not have to make many changes to your code.
Here are some examples:
| Input is | Type hint | Default value | Example |
|---|---|---|---|
| Text | |||
| Text | str |
Any | def my_func(arg1: str) |
| Single item from a list of fixed items | str |
List of allowed text items | def get_gdp(country: str = ["USA", "Canada", "Mexico"]) |
| List of items and users can add their own items | list |
Blank | def enter_web_urls(urls: list) |
| List of items and users must choose from a fixed set of items | list |
List of fixed set of items | def enter_web_urls(urls: list = ["google.com", "youtube.com", "facebook.com", "bing.com"]) |
| Numbers | |||
| Number | int or float |
Blank | def enter_score(score: int) or def enter_score(score: float) |
| Bounded number | int or float |
List of bounds and step size in the format: range(min, max, step) |
def enter_score(score: int = range(0, 10)) or def enter_score(score: float = list(np.arange(0, 10, 0.1))) |
| Images and documents | |||
| Image | PIL.Image.Image |
Blank or default image (PIL format) | def upload_image(image: PIL.Image.Image) |
| Any document | Built-in component Upload |
Blank | def upload_doc(doc: Upload) |
| Dates | |||
| Single date | datetime.date or datetime.datetime |
Blank or default date | def set_date(date: datetime.date = datetime.date(2023, 1, 1)) |
| Modern type hints | |||
| Fixed set of string options | Literal["a", "b", "c"] |
Any of the values | def pick(choice: Literal["red", "green", "blue"]) |
| Enum members | enum.Enum subclass |
Any enum member | class Color(Enum): RED = "red"def pick(c: Color) |
| Bounded number via type hint | Annotated[int, range(min, max, step)] |
Any int/float | def score(s: Annotated[int, range(0, 100)]) |
| Dropdown via type hint | Annotated[str, [list]] |
Any of the values | def pick(c: Annotated[str, ["USA", "Canada"]]) |
| Optional value | Optional[T] |
Any T |
def ping(text: Optional[str]) |
| Reactive inputs | |||
| Cascading dropdown | Use depends_on(parent, resolver) as the default |
The parent input's name and a resolver that returns options | def pick(country: str = ["USA"], state: str = depends_on("country", lambda c: states[c])) |
2. Setting output components
We've seen that we can set the desired input component by choosing a specific combination of input type hints and default values. Setting output components works similar to that.
Reminder
Return type hints in Python are written in the function description following the -> symbol.
For example,
def my_func(...) -> strindicates that the first return value is a string.def my_func(...) -> (str, int)indicates that the first return value is a string and the second return value is an integer.
Here's how to set the desired components using return type hints:
| Output is | Type hint | Example |
|---|---|---|
| Text | str |
def my_func(...) -> str: |
| Number (treated as text) | int or float |
def my_func(...) -> int: or def my_func(...) -> float: |
| Image | PIL.Image.Image |
def my_func(...) -> PIL.Image.Image: |
| Matplotlib figure | plt.Figure |
def my_func(...) -> plt.Figure: |
| Plotly graph | Built-in component Graph |
def my_func(...) -> Graph: |
| Pandas Dataframe | pd.DataFrame or built-in component Table. Using Table lets you set the pagination page size using Table(page_size=20) |
def my_func(...) -> pd.DataFrame: or def my_func(...) -> Table: or def my_func(...) -> Table(page_size=20): |
| Conversation (chat) | Built-in component Chat. Output must be formatted as a dictionary in the format {"query": query, "response": response} |
def my_func(...) -> Chat: |
3. Arranging output components
Fast Dash allows customizing the visual arrangement of your output components. The idea is using “mosaics.” Drawing inspiration from Matplotlib’s subplot_mosaic method, Fast Dash lets you craft layouts using an ASCII-esque diagram or a string list.
Each unique letter or string in this mosaic signifies a unique component. This approach is a game-changer, especially when you’re aiming for non-uniform grid layouts.
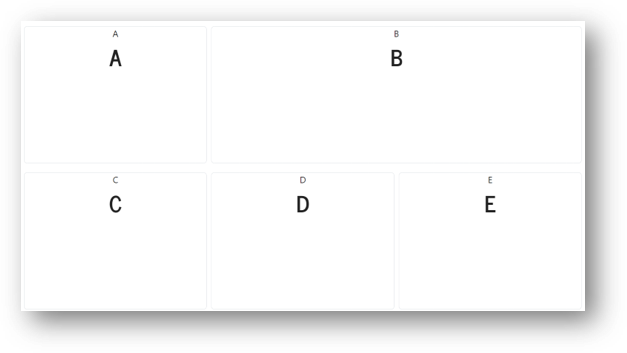
For example, imagine the output arrangement you want is something like in the following image:

In this case, you can define your mosaic to be “ABB \n CDE”. Fast Dash will set the app for five outputs and divide the space into six equally-sized boxes placed as a 2 x 3 grid.
The first output gets the top-left box. The second output stretches across the next two boxes in the top row. And each of the remaining three outputs gets its own box in the row below.
Refer to the examples below to understand this idea better.
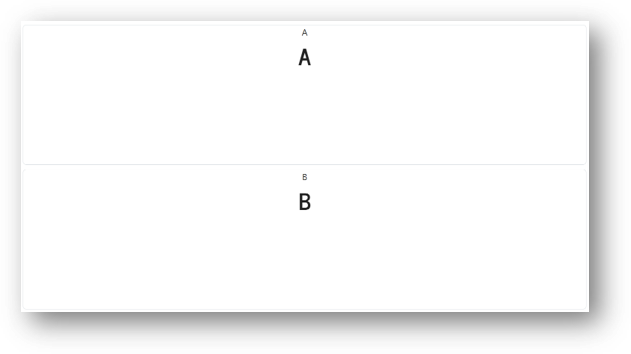
Example 1: Two outputs
We have two outputs and we want them to appear one below the other.
mosaic = """
A
B
"""

@fastdash(mosaic=mosaic)
def my_func(arg1: str) -> (str, str):
    return "A", "B"
Output:
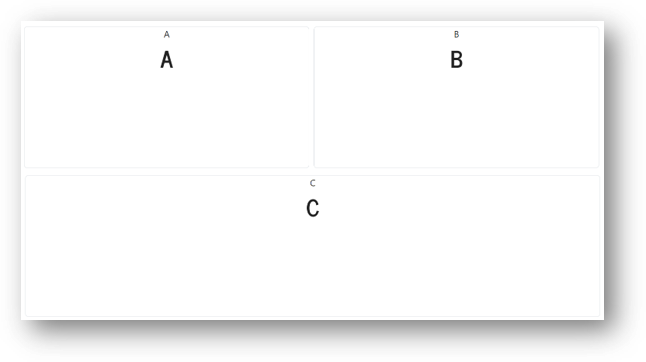
Example 2: Three outputs
We have three outputs. The first two should appear next to each other in the first row and the third should appear below them taking up the entire second row.
mosaic = """
AB
CC
"""

@fastdash(mosaic=mosaic)
def my_func(arg1: str) -> (str, str, str):
    return "A", "B", "C"
Output:
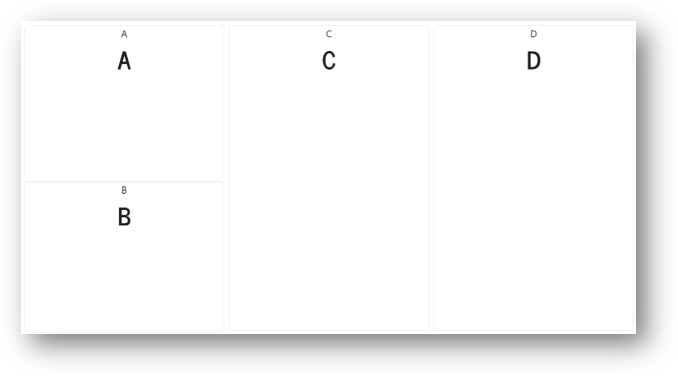
Example 3: Four outputs
We have four outputs. The first two should appear one below the other in the first column, and the remaining two should take up the entire second and third columns respectively.
mosaic = """
ACD
BCD
"""

@fastdash(mosaic=mosaic)
def my_func(arg1: str) -> (str, str, str, str):
    return "A", "B", "C", "D"
Output:
Example 4: Five outputs
This example has five outputs. Here are the requirements:
- The 1st output must appear first.
- The 2nd output must be twice as wide as the first output.
- The 3rd, 4th and 5th outputs must be in the second row and have the same width.
mosaic = """
ABB
CDE
"""

@fastdash(mosaic=mosaic)
def my_func(arg1: str) -> (str, str, str, str, str):
    return "A", "B", "C", "D", "E"
Output:
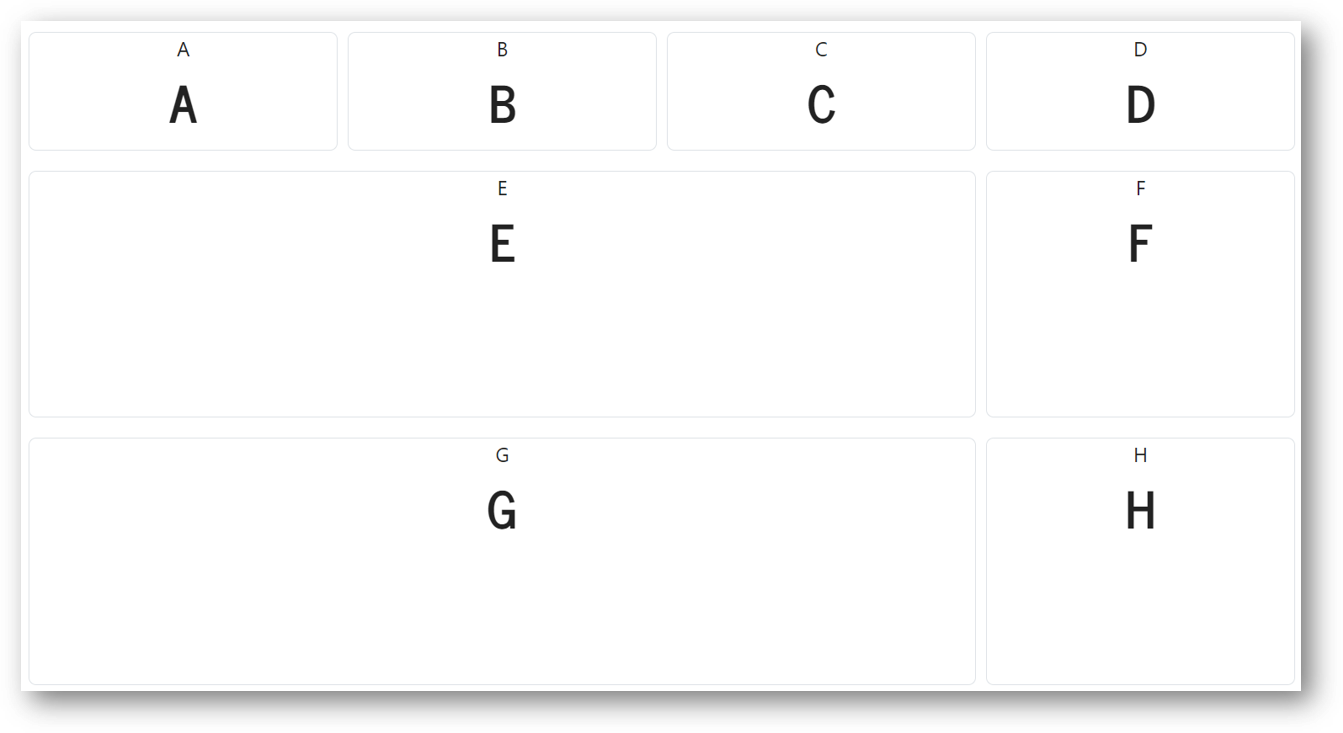
Example 5: Eight outputs
This is a slightly complicated example with 8 outputs, reminiscent of some BI dashboards. Here's what we want:
- The first 4 components appear one after the other horizontally (like overview KPIs in a dashboard).
- The 5th output appears directly below the first 3 components while the 6th appears directly below the 4th.
- The 7th appears directly below 5th and the 8th appears directly below the 6th.
- Let's add a complication intentionally: Components 5 through 8 should be twice as tall (vertically) as the first 4 components.
No problem! it's easy to have this layout with Fast Dash just by writing the appropriate mosaic string, without touching the main Python code.
# Notice that the second and third component rows have been repeated
# to make them appear twice as high as the first component row
mosaic = """
ABCD
EEEF
EEEF
GGGH
GGGH
"""

@fastdash(mosaic=mosaic)
def my_func(arg1: str) -> (str, str, str, str, str, str, str, str):
    return "A", "B", "C", "D", "E", "F", "G", "H"
Output:
4. Multi-function tabbed apps
When you have several related functions and want them in one app, pass a list of callbacks. Fast Dash builds a tabbed layout where each function gets its own tab with independent inputs, outputs, and callbacks.
1 2 3 4 5 6 7 8 9 10 | |
tab_titles is optional — without it, tabs are named after the functions (converted from snake_case to Title Case). The navbar, about modal, and streaming notifications are shared across all tabs; component IDs are namespaced per tab so they don't collide.
5. Reactive inputs with depends_on
When one input's options should depend on another input's value (cascading dropdowns, dynamic ranges, prefilled values), use depends_on as the dependent parameter's default:
1 2 3 4 5 6 7 8 9 10 11 12 13 | |
The first argument to depends_on is the parameter name of the parent input. The second is a resolver function that receives the parent's current value and returns one of:
- a list — sets the dependent dropdown's options and clears its value;
- a dict like
{"data": [...], "value": ...}— sets either or both; - a scalar — sets just the dependent's value (e.g. derived numbers, prefilled text).
If the resolver raises an exception, no update fires. Chains work: A → B → C is just two depends_on declarations.
6. Multi-step pipelines
When your workflow naturally splits into stages — load data → transform → visualize — turn the whole pipeline into a single app with steps=:
1 2 3 4 5 6 7 8 9 10 11 12 13 14 15 16 | |
Each step is rendered as a dedicated panel with its own inputs and outputs. A stepper progress indicator at the top of the main area shows the current step. Click Run to execute the active step, then Next to advance.
Wiring upstream outputs into downstream inputs
Use from_step(prev_fn) as a parameter default to pull a previous step's return value into the current step's parameter:
- The framework caches each step's return value per browser session.
- When a downstream step runs,
from_stepparameters are filled in automatically — no UI is rendered for them. - Mix
from_stepparameters with regular UI parameters freely (seesummarise'sprefixabove). from_step(prev_fn, transform=lambda x: ...)applies a function to the cached value before passing it.
Navigation and state
- Back rewinds one step and clears all downstream cached results, so you can rerun a different branch of inputs.
- Run executes the currently visible step. Until you click Run, the Next button is disabled.
- Trying to run a downstream step before its
from_stepsource has been run produces a friendly error message instead of a traceback. - State is keyed by a UUID stored in the browser's session storage, so opening the app in a new tab gives you a fresh pipeline.
Limits
- Linear pipelines only — no conditional branching in this release.
- The cache lives in the FastDash process; a server restart or a multi-worker deployment loses session state. Acceptable for prototyping.
7. Selecting other configurations
Finally, customize your app by controlling various options like the theme of the app, social media branding links, subheaders, deployment mode and so on.
In the next section, we'll see what Fast Components are, what separates them from other Dash components, and how we can easily modify Dash components to make them compatible with Fast Dash.